

Table of contents
Table of contents
If you've ever wanted to build a robot, automate your home, or create your own electronics projects, you've probably come across Arduino.
But what exactly is it? Is Arduino a programming language? A microcontroller? A development board? Or something else entirely?
The short answer is that Arduino is an open-source electronics platform that combines easy-to-use hardware and software, making it one of the most popular ways to learn programming and electronics.
This guide explains how Arduino works, why so many people start there, and what you can build with it, even if you've never written a line of code.
What is Arduino?
Arduino is an open-source electronics platform with two halves: a board you hold in your hand, and software you write code in.
The board is a microcontroller development board. At the centre sits a microcontroller, a small chip that runs one program at a time. Around that chip, the board adds everything the chip needs to be useful to you: a USB connector for power and programming, a voltage regulator, a reset button, and rows of pin headers you can plug wires into.

The software is the Arduino IDE, a free program you install on your computer. You write your code there, plug the board in over USB, and press upload. A few seconds later the program is running on the board, and it keeps running every time the board gets power, with or without a computer attached.
An Arduino program is called a sketch. Every sketch has two functions:
void setup() {
  // runs once, when the board powers on
}

void loop() {
  // runs over and over, forever
}
That's the whole model. Set things up once, then repeat something forever.
Libraries are pre-written code that handles the hard parts of talking to a specific component. Instead of working out the timing of a temperature sensor's data protocol, you install its library and call readTemperature(). There are libraries for thousands of sensors, displays and modules, and most of them are free.
Open-source means the board schematics and the software source code are public. Anyone can build a compatible board, which is why "Arduino" today describes an ecosystem far bigger than the boards made by Arduino themselves.
How does Arduino work?
Arduino does the same three things in a loop, thousands of times per second:
- A sensor or a button changes state.
- Arduino reads that input.
- Your code decides what to do.
- Arduino controls an output.
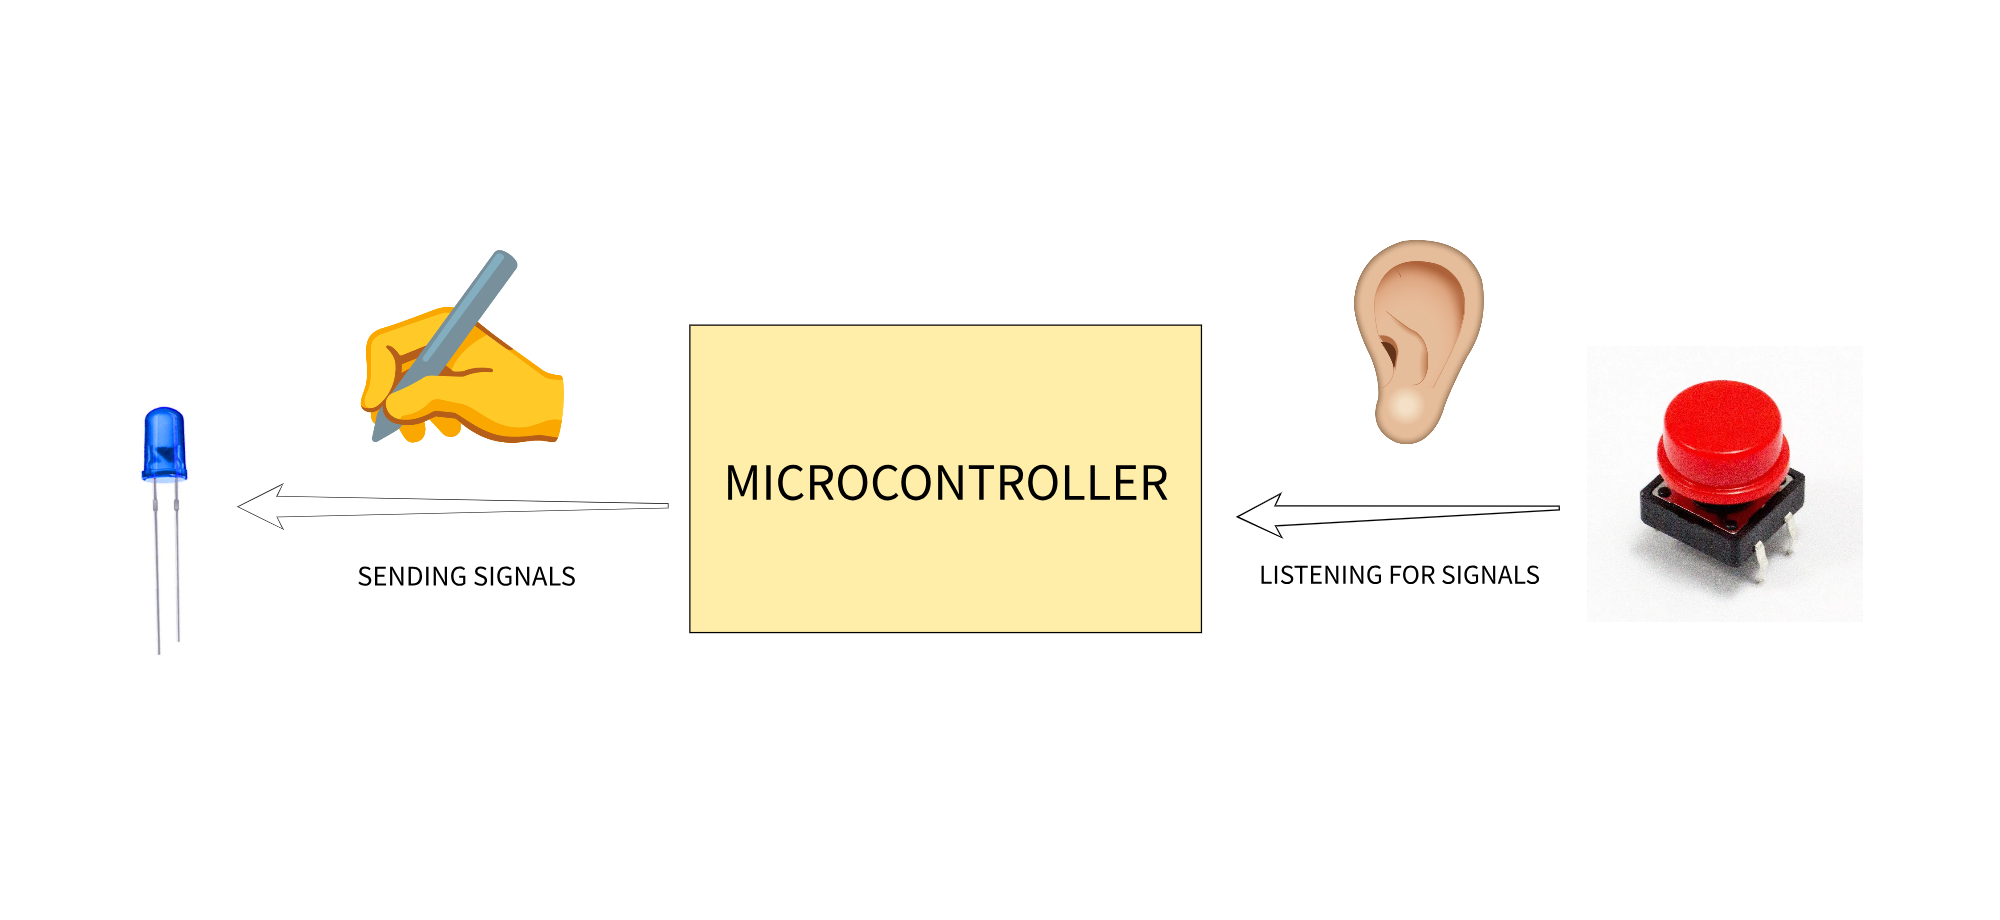
Every Arduino project, from a blinking LED to a weather station, is some version of that loop. What changes is what you plug into the input side, and what you plug into the output side.
| Input | What your code checks | Output |
|---|---|---|
| Button | Is it pressed? | Turn an LED on |
| Temperature sensor | Is it above 28 °C? | Switch on a fan |
| Motion sensor | Did something move? | Sound a buzzer |
| Light sensor | Has it gone dark? | Turn on a lamp |
| Potentiometer | Which way is it turned? | Move a servo |
The pins are how the board reaches the outside world. Digital pins read and write on or off. Analog pins read a voltage as a number, so a light sensor becomes a value you can compare against a threshold. PWM pins switch a pin on and off fast enough to act like an in-between voltage, which is how you dim an LED or set a motor's speed.
Every board publishes a pinout that tells you which pins can do what. Here is one:
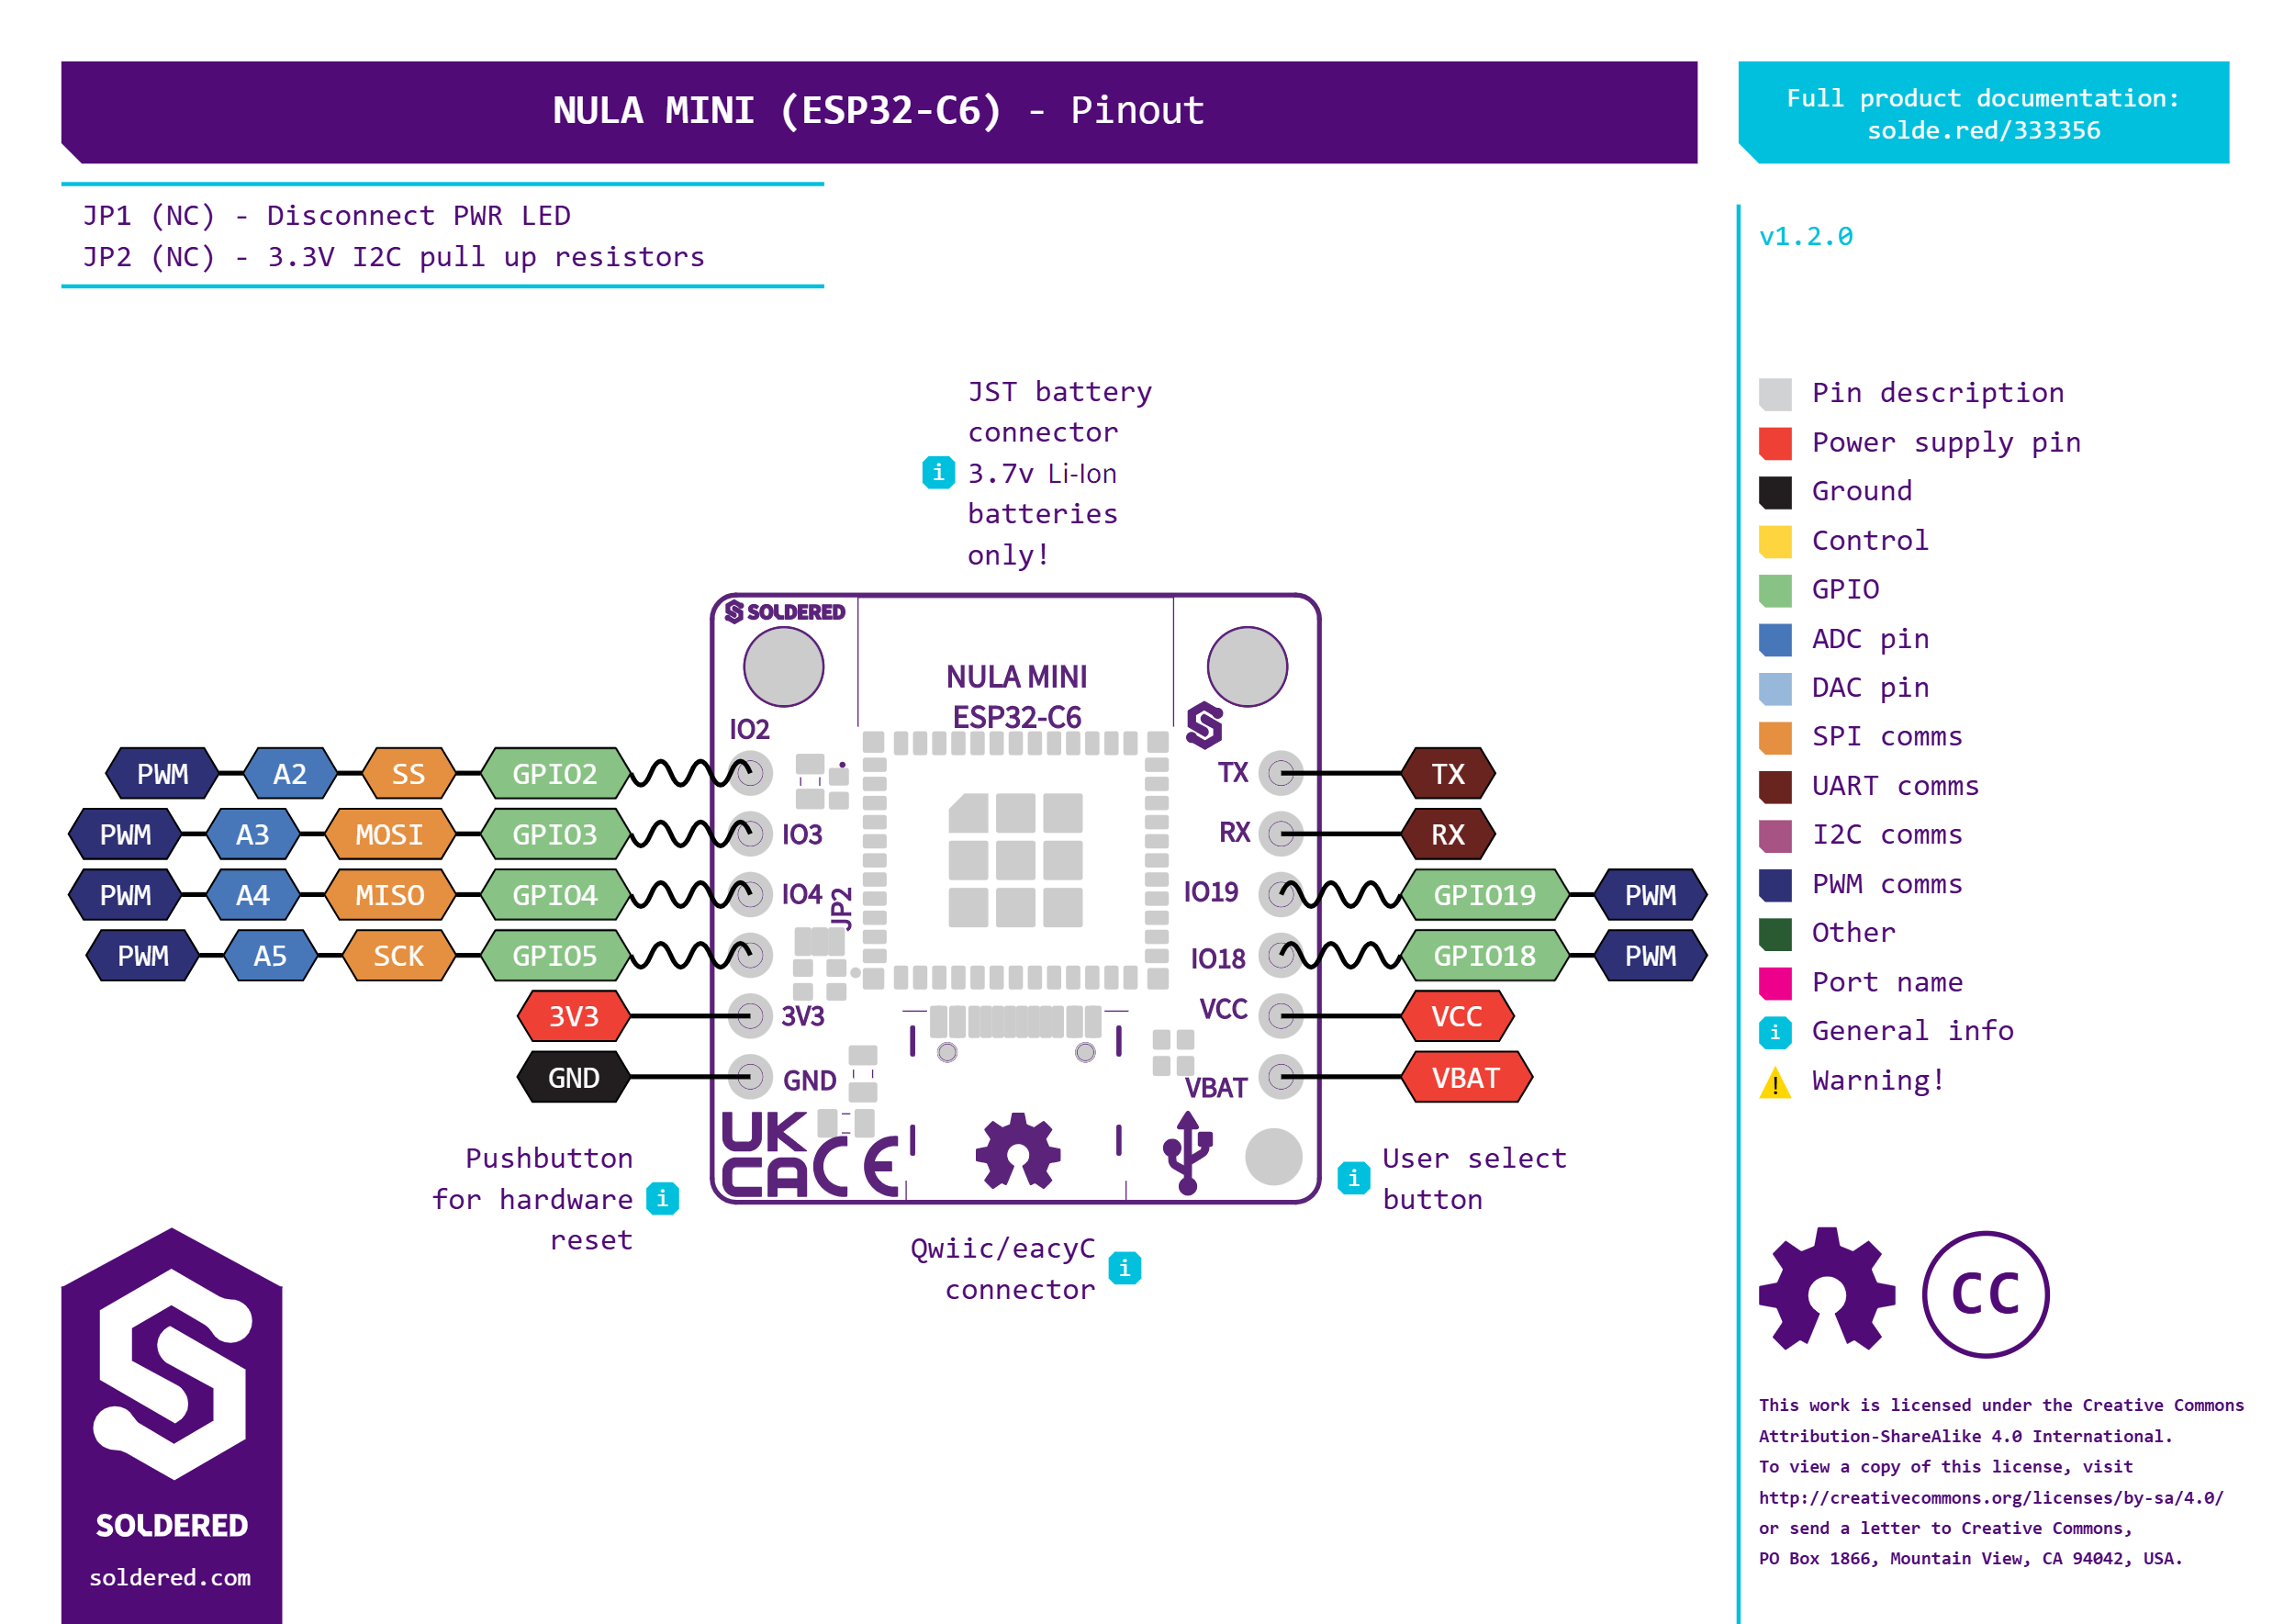
Once you understand that loop, the rest is picking parts.
What makes Arduino so popular?
Easy to learn
You can get a result on your first evening. Plug in the board, open the Blink example, press upload, and an LED starts flashing. Nothing to configure, no operating system to install, no toolchain to set up.
The code is C++, but you use a small, forgiving slice of it. digitalWrite(13, HIGH) turns pin 13 on. Most beginner sketches are 20 lines or fewer.
When something doesn't work, someone has already had your problem and posted about it. Twenty years of forum threads, tutorials and example code are a search away.
Affordable
A capable board costs less than a takeaway meal. A starter kit with a board, breadboard, jumper wires, LEDs, resistors and a handful of sensors costs less than a textbook. If you destroy a board by wiring something backwards, you replace it and carry on.
That price is why Arduino ended up in so many classrooms. A school can equip a whole lab for the cost of one lab instrument.
Thousands of compatible components
Arduino's pin layout and its I2C and SPI buses became a de facto standard, so almost every hobby-grade component you can buy already works with it:
- Sensors for temperature, humidity, pressure, distance, motion, light, gas, current and orientation
- Displays from small OLEDs to e-paper panels
- Motors, servos and stepper drivers
- Wi-Fi, Bluetooth, LoRa, GPS, RFID and Ethernet modules
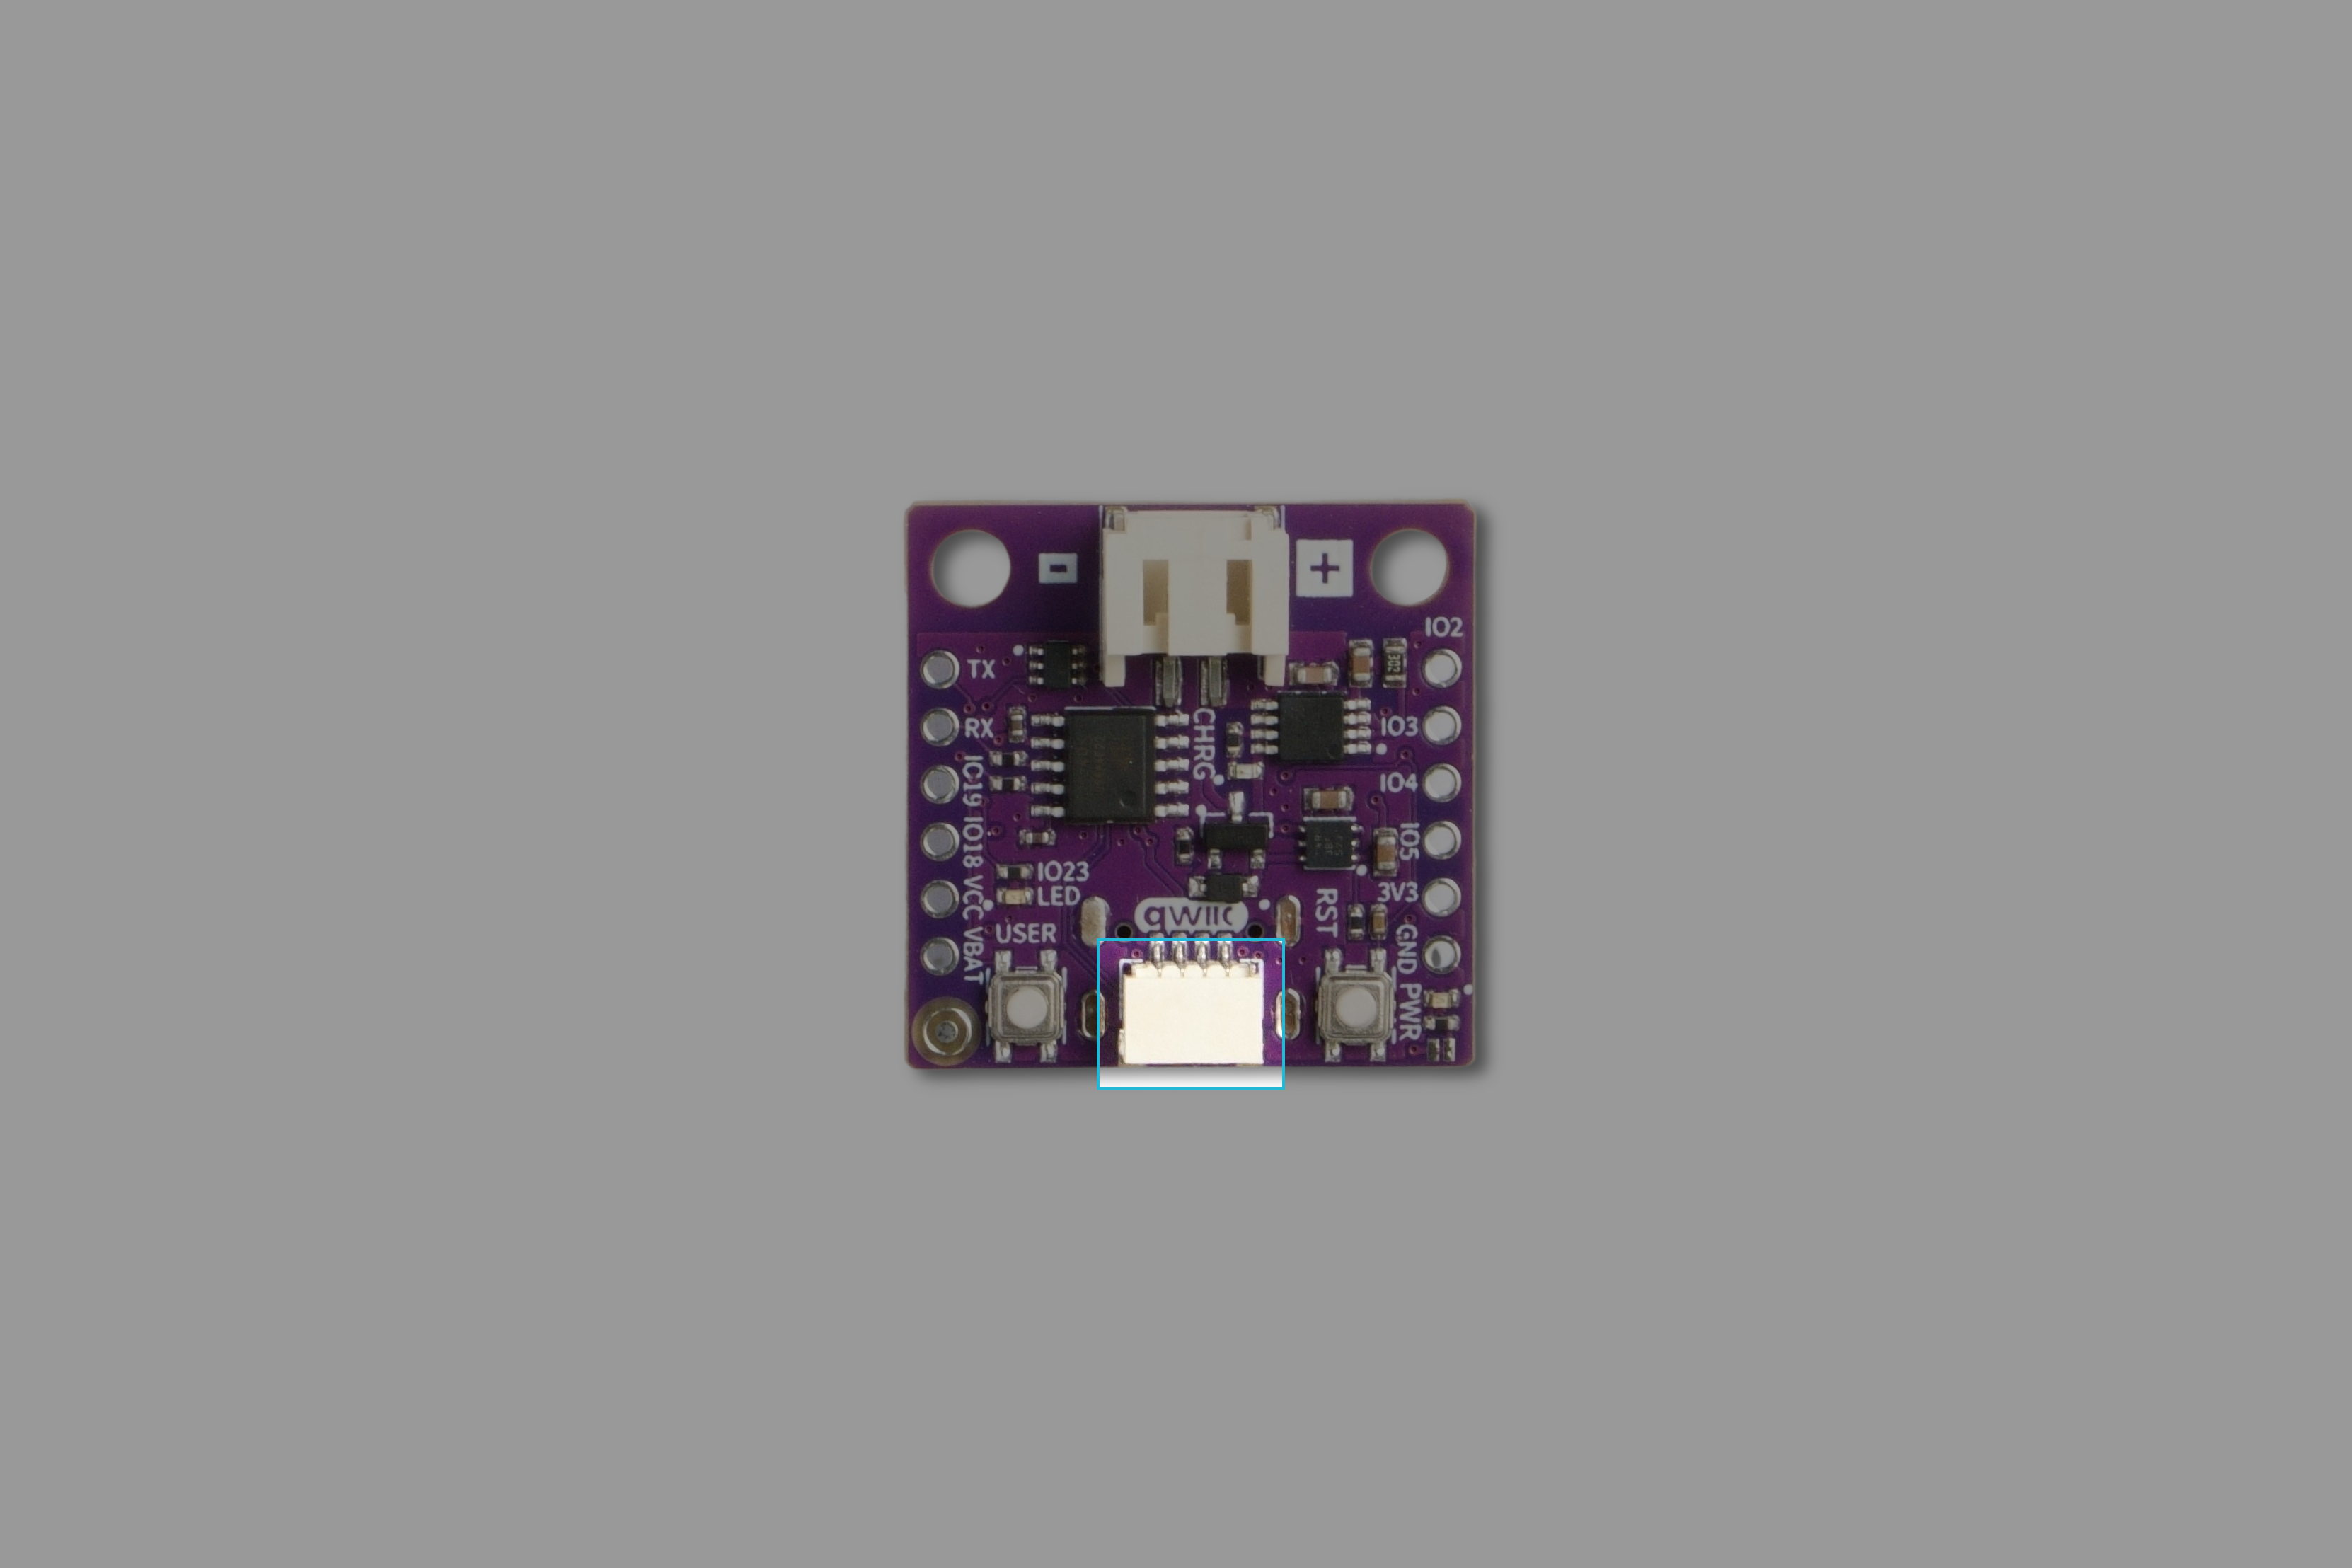
Most come with a library, an example sketch and a wiring diagram. Connectors like Qwiic go further and remove the wiring entirely: sensors chain together over one four-wire cable that carries power and I2C.
Open-source ecosystem
Open-source is the reason all of the above exists. Because the platform is public, manufacturers build compatible boards and developers publish libraries for their own parts, and none of it needs anyone's permission. When you buy a sensor, you're usually also getting a library someone wrote and maintains for free.
Arduino vs a microcontroller
These two get mixed up constantly, and the difference is simple.
Microcontroller: the chip.
Arduino: a development board built around that chip.
A microcontroller is a single integrated circuit. To use one on its own you have to supply a clean regulated voltage, add a crystal for its clock, wire up a programmer to get code onto it, and build a circuit around it. That is a project in itself, before you have written any code.
An Arduino board is that same chip with all of the surrounding work already done for you.
| Microcontroller | Arduino board | |
|---|---|---|
| What it is | A chip | A board built around a chip |
| Programming | Needs a separate programmer | USB cable |
| Power | You design the regulator | On board |
| Clock | You add a crystal | On board |
| Connections | Solder to the chip's legs | Pin headers |
| Time to first blink | Hours | Minutes |
| Cost | Cheaper per unit | Cheaper per project |
Use bare microcontrollers when you're designing a product and every cent and millimetre counts. Use an Arduino board when you want to build something this week.
What can you build with Arduino?
Smart home
Home projects are the usual starting point, because the loop maps so neatly onto them: read a room, decide something, switch something on.
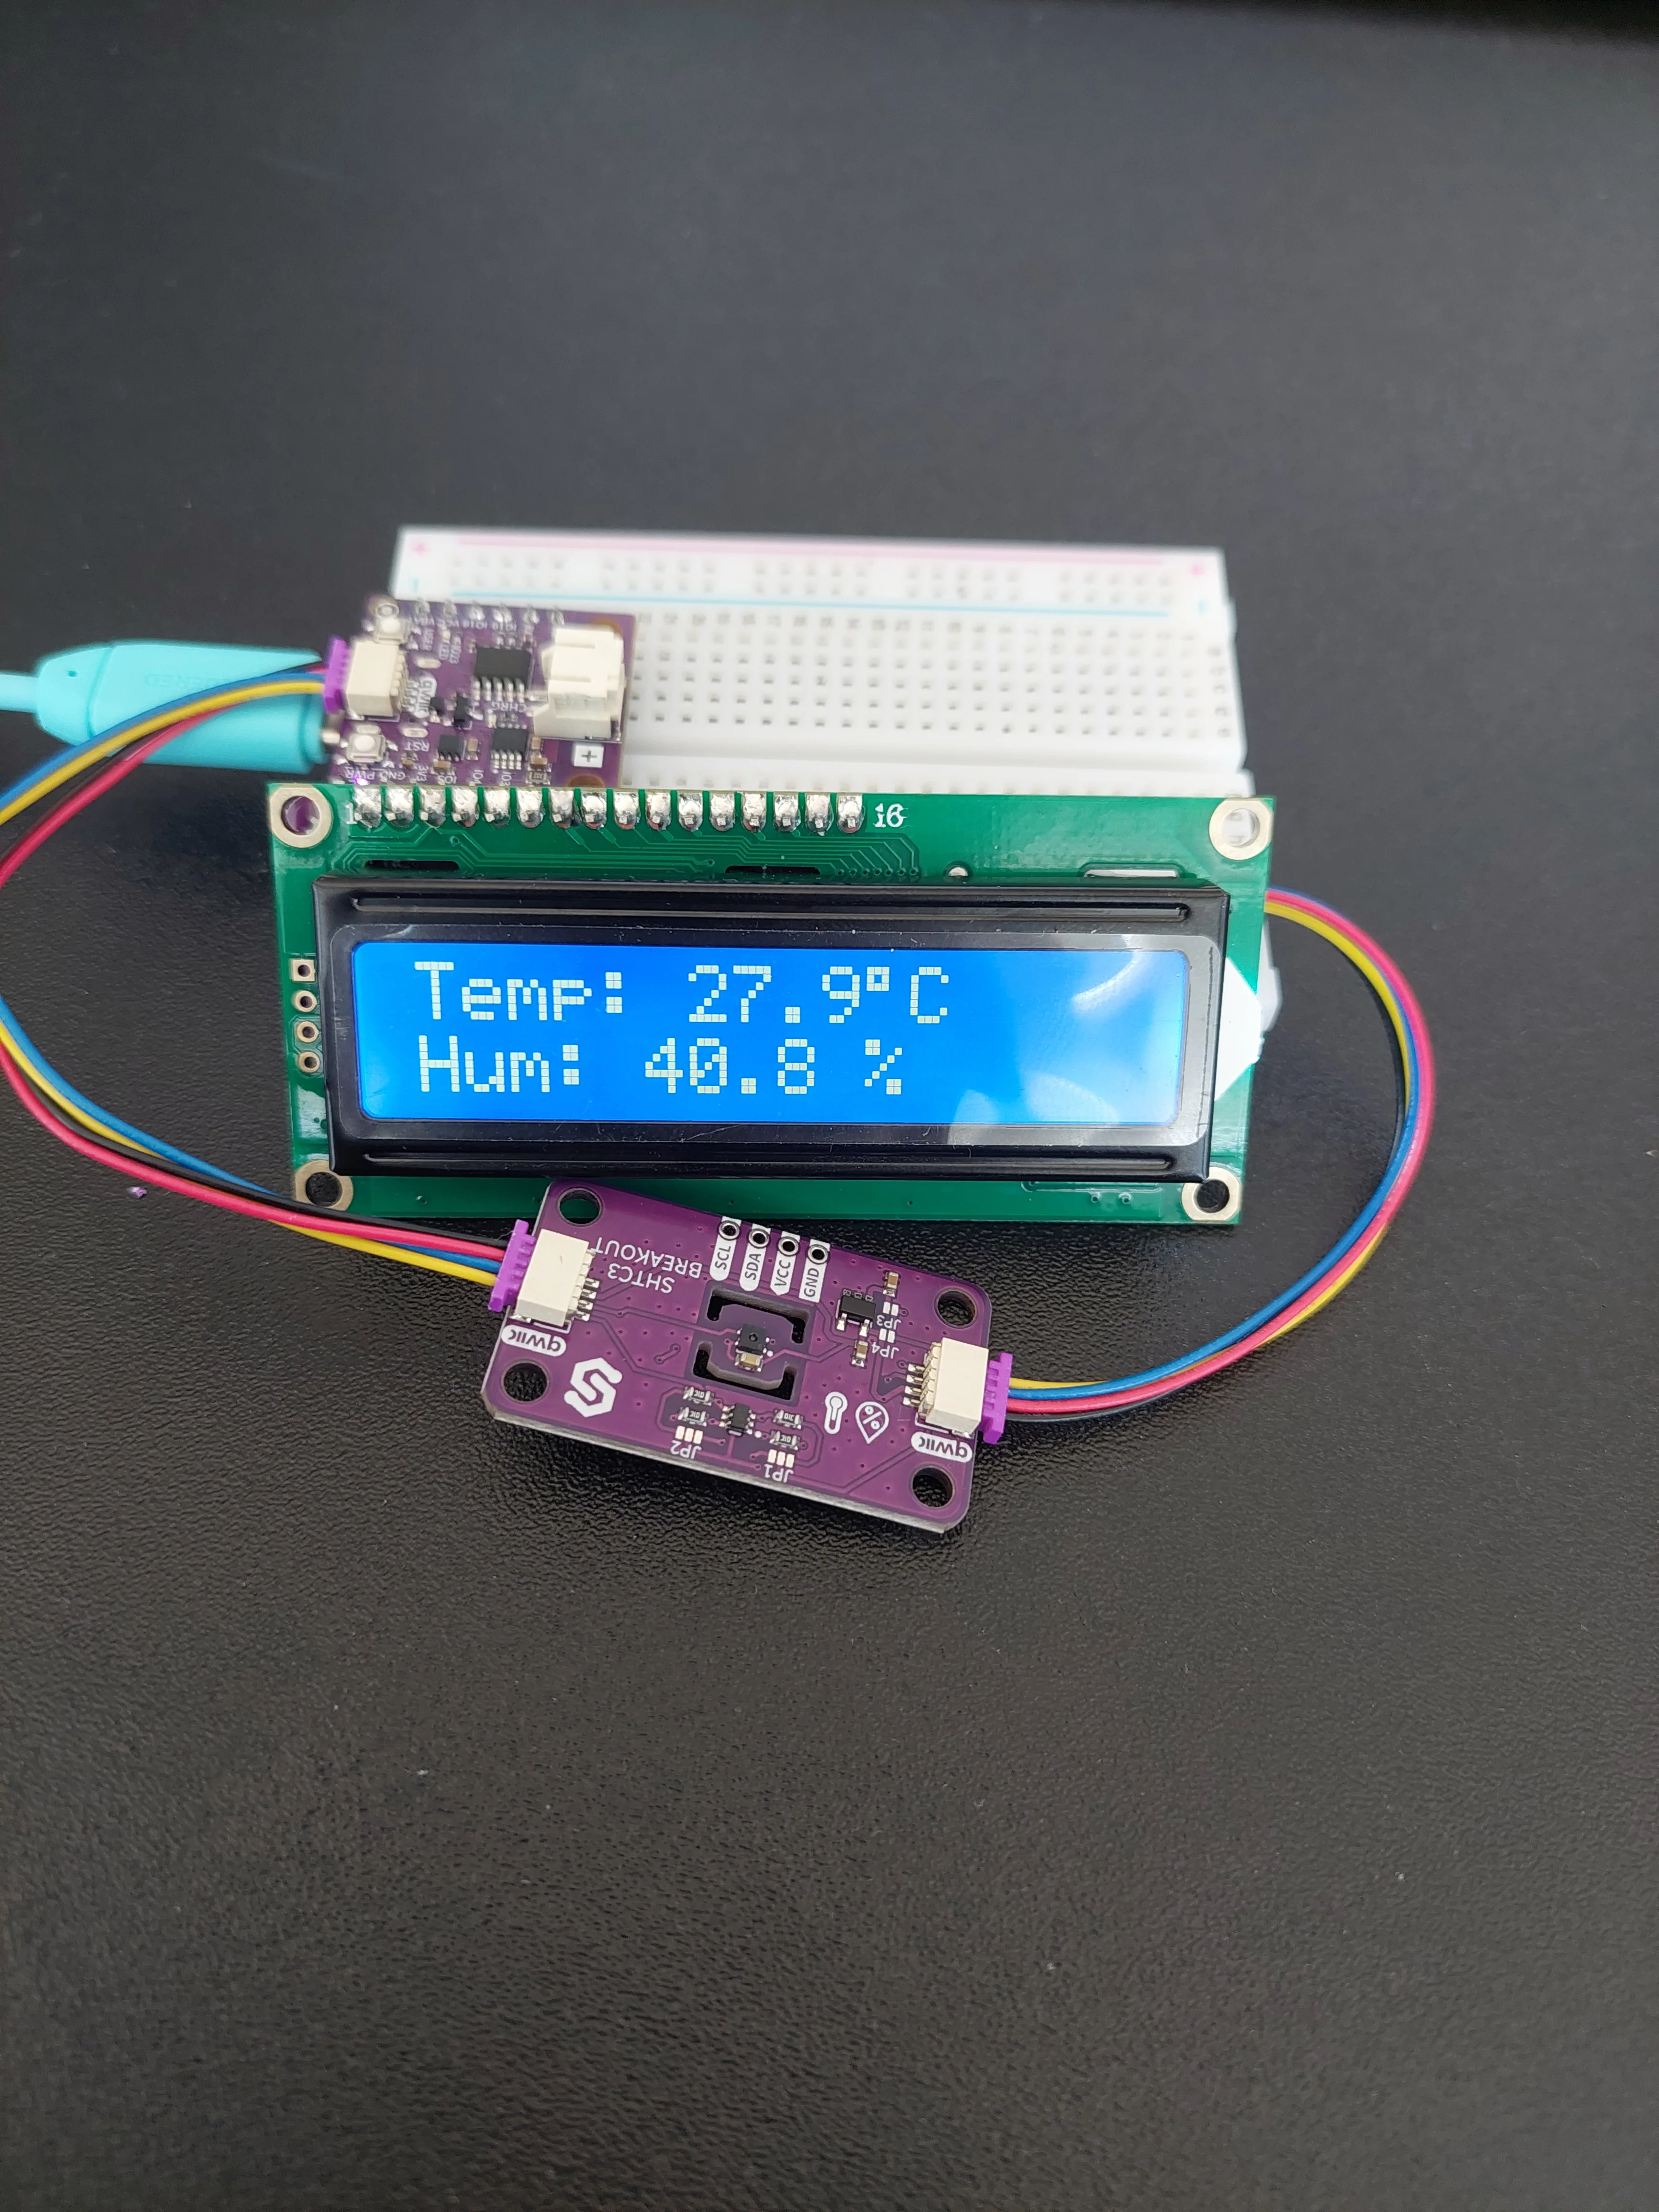
- A temperature and humidity monitor that logs to your phone
- A motion sensor that turns hall lights on at night
- Smart lights that follow a schedule or ambient brightness
- A plant watering system that reads soil moisture
A waterproof temperature probe is one of the easiest first sensors, since it reads a real number over a single data wire.


Robotics
Robotics is where outputs get interesting, because the board is now moving something physical.
- An obstacle-avoiding robot using an ultrasonic distance sensor
- A line-following car with reflectance sensors
- A robotic arm driven by servos
- A camera pan-tilt mount
Small hobby servos are the standard first actuator. They take a single PWM signal and hold a position, which is much easier to control than a plain DC motor.


Environmental monitoring
- A weather station logging temperature, humidity and pressure
- An indoor air quality monitor tracking CO2 and VOCs
- A rain and wind gauge
- A UV index meter
These make good second projects. The wiring is straightforward, and the work shifts to storing data and displaying it usefully.
Displays
Once your project has something to say, it needs a screen. Small OLEDs are fine for a few lines of text. For anything you'll actually read across a room, e-paper is a better fit, because it holds an image with no power at all and stays readable in direct sunlight.


E-paper suits dashboards, room displays, calendars and clocks, and anything battery-powered that updates a few times an hour rather than a few times a second. Our e-paper display project ideas go through fifteen of them.
For more starting points across all of these categories, see 15 Arduino project ideas for beginners and makers. If you're building with younger makers, fun Arduino projects for kids is a gentler list.
Which Arduino board should beginners choose?
There are dozens of boards, and comparing all of them is how beginners end up buying none. Three will cover almost everyone.
Best overall: NULA Core
An ATmega328P board with 32 KB of flash, 22 I/O pins (14 digital and 8 analog), USB-C, a Qwiic connector, and a Li-ion battery connector with a charger on board, all in 63 x 22 mm.
It runs the same 8-bit chip that almost every Arduino tutorial ever written was written against, so example code you find online runs unmodified. You get USB-C instead of the old B-type socket, sensors that chain over one Qwiic cable, and a battery you can charge from the board.


Best for learning electronics: Embedded Journey Kit
A board on its own doesn't teach you electronics. You still need a breadboard, jumper wires, resistors, LEDs, a few sensors, and something telling you what to wire where.
The Embedded Journey Kit is a NULA Mini ESP32-C6, plus all of those parts, plus a full set of worked examples in both Arduino and MicroPython. You work through them in order, and each one adds a component and an idea.

Best if you want Wi-Fi: NULA Mini ESP32-C6
An ESP32-C6 board in a much smaller footprint, with Wi-Fi 6, Bluetooth 5 Low Energy, and 802.15.4 for Thread and Zigbee. That last part matters if you want your project to join a Matter or Zigbee smart home network rather than talk to it over your router.
Technically it isn't a traditional Arduino board. It supports the Arduino ecosystem while adding wireless the classic boards never had.
It's also the board inside the Embedded Journey Kit, so you don't need both.
One practical note: it uses a CH340K USB-to-serial chip, so on Windows install the CH340 driver before your first upload.


To see how these compare against other options, we've written up the best Arduino-compatible boards for makers.
Common beginner mistakes
Almost every problem a beginner hits is one of these. None of them are your fault, and all of them are quick to fix.
Wrong board selected in the IDE. Uploads fail, or succeed and then nothing happens. Check Tools > Board and make sure it matches the board in your hand. If your board isn't in the list, install its board package first.
Forgetting GND. A sensor needs both power and a shared ground with the board. With no ground connection it reads garbage, or nothing at all. If a component behaves erratically, check ground before you check anything else.
Wrong port, or no port at all. If Tools > Port is empty, your computer isn't seeing the board. Usually that's a missing USB-to-serial driver rather than a broken board: boards using CH340 or CP2102 chips need their driver installed on Windows. It can also be a charge-only USB cable, which carries power but no data.
Missing library. The example compiles on someone else's machine and throws No such file or directory on yours. That error names the header it can't find. Install that library from Tools > Manage Libraries and compile again.
Powering motors from the board's 5 V pin. A servo or motor draws far more current than the on-board regulator can supply. The board browns out and resets, usually mid-movement, which looks exactly like a code bug. Give motors their own supply, and connect only the grounds and the signal wire back to the board.
Serial monitor at the wrong baud rate. Your sketch prints at 115200, the monitor is set to 9600, and you get unreadable symbols. The number in Serial.begin() and the number in the monitor have to match.
Why Soldered is a good place to start learning Arduino
Buying components one at a time works, but it's slow, and half the parts arrive without documentation. Most beginners get further starting with boards, sensors and kits that already work together and come with examples that run.
Everything we make is documented at docs.soldered.com, with wiring diagrams, libraries and working example code for each product. Our sensors use Qwiic, so you can chain them with one cable instead of wiring each one by hand.
If you're starting from nothing, one kit covers it:
That's a NULA Mini ESP32-C6 with a mini breadboard, jumper wires, 13 LEDs, resistors, buttons, a buzzer and a shift register, plus three Qwiic sensors: a 16x2 LCD, an HC-SR04 distance sensor, and an SHTC3 temperature and humidity sensor. There is nothing else to buy to get through every example in it.
If you already have a board and would rather assemble your own parts, these three cover almost every beginner circuit:


Either route gets you from the first blinking LED through to a project that reads sensors and shows results on a screen.
The short version
- Arduino is a microcontroller board plus free software, and the loop it runs is always the same: read an input, decide, set an output.
- It's popular because you get a working result on day one, the boards are cheap, and thousands of components already have libraries written for them.
- Start with a kit rather than loose parts, and pick your projects from what you actually want in your house.
Frequently asked questions
What is Arduino used for?
Reading sensors and controlling outputs. In practice that means home automation, robotics, data logging, environmental monitoring, art installations, musical instruments, and prototyping the electronics for a product before committing to a custom board.
Is Arduino good for beginners?
Yes. It's the most common entry point into electronics, mainly because you can get a working result on day one and because every problem you'll hit has already been answered somewhere.
Do I need programming experience to use Arduino?
No. You'll want to learn what a variable, an if statement and a loop are, which takes an afternoon. Beyond that you spend most of your time adapting example sketches, not writing code from scratch.
Is Arduino a programming language?
No, though people talk about it that way. Arduino sketches are C++ using the Arduino library. The library is what makes it feel like its own language, by hiding the microcontroller's registers behind functions like digitalWrite() and analogRead().
What is the difference between Arduino and Raspberry Pi?
Arduino is a microcontroller board: it runs one program, boots instantly, and is good at timing-sensitive control. A Raspberry Pi is a small computer running Linux: it has an operating system, runs many programs at once, and is good at cameras, networking and anything needing real processing power. We compare both against the ESP32 in Arduino vs Raspberry Pi vs ESP32.
Which Arduino board should I buy first?
If you want one board, a NULA Core. If you're learning electronics from zero and want the parts and the lessons with it, the Embedded Journey Kit.
Can Arduino be used for IoT projects?
Yes, with a board that has wireless built in. Classic Arduino boards need a separate Wi-Fi or Ethernet module. ESP32-based boards like the NULA Mini ESP32-C6 or the NULA DeepSleep ESP32-S3 have Wi-Fi and Bluetooth on board and still program from the Arduino IDE.
Is Arduino free to use?
The software is. The Arduino IDE is free, the core libraries are open-source, and almost every third-party library is free. You pay for hardware.


