


- Dasduino (Arduino-compatible)

- Inkplate

- easyC ecosystem

- Raspberry Pi & Micro:bit

- Breadboards & Cables

- Batteries & Power supplies

- Kids

- Sensors

- Actuators

- Communication

- Tools & Lab equipment

- Soldering kits

- Components

- Sale

Shop
24/7 free customer and technical support
Comprehensive documentation
Open-source hardware and software
2-year Warranty - no questions asked
Showing 265–288 of 684 resultsSorted by average rating
Coming soon

Breadboard power supply board
If you need a simple and stable power source for your breadboard projects, this board is here to help. Supply it with DC jack DC power or using UCB-C cable, and the board provides 3.3V, 5V or 12V directly to the power supply lines on the breadboard. Output voltages are adjustable seperately using the onboard switches. There’s a power LED, a power switch and an automatic voltage selection circuit, in case both power inputs are there.

PIR Movement sensor board
A PIR (passive infrared) motion sensor is a device that detects physical movement within its field of vision by sensing changes in infrared radiation. This sensor works on the principle of detecting thermal thermal signals emitted by objects, mainly warm-blooded creatures like humans. The “passive” in the name refers to the fact that the sensor itself does not emit or radiate any energy for detection.
Easily connects to Dasduino/Arduino via digital pin. When it detects movement, it sets the output digital pin to HIGH. The angle that the sensor “sees” is 100 degrees and reaches up to 5 meters. It has a potentiometer for delay (how often to check for movement).
It is often used in a variety of applications, including home security systems, automatic lighting, and energy management, among others.

Hall effect sensor breakout with digital output
The hall effect sensor (Hall Effect sensor) will be able to detect the magnetic field in its vicinity thanks to the aforementioned physical law. A magnetic field that can be created by a magnet, a current flowing through a conductor or some third source, the Hall effect sensor will recognize each. This sensor has a programmed threshold at which it will change the state of its output signal, so it is a sensor with a digital output.

Hall effect sensor breakout with digital output & easyC
The hall effect sensor (Hall Effect sensor) will be able to detect the magnetic field in its vicinity thanks to the aforementioned physical law. A magnetic field that can be created by a magnet, a current flowing through a conductor or some third source, the Hall effect sensor will recognize each.
This sensor has a programmed threshold at which it will change the state of its output signal, so it is a sensor with a digital output. Through the easyC connectors, it enables a simple connection with the microcontroller.

Simple rain sensor board with easyC
This sensor has two pieces – the rain sensor and the simple sensor. The rain sensor has nickel-coated lines on both sides. It measures moisture and outputs the data to the simple sensor that reads it. The simple sensor comes with easyC connectors onboard, which enables quick and easy connection with Dasduino microcontroller boards.
With the easy-to-use simple rain sensor, farmers can save water in irrigation. The sensor will alert them to shut down the water supply when it senses rain. It can even act as an automatic on and off switch, like turning on wipers on a car when it senses rain.

Simple fire sensor board
This module is a phototransistor that is capable of detecting infrared radiation. Since fire radiates a large number of infrared rays, this sensor will detect them, but this is not its only application. Wherever there are infrared waves, the sensor will detect them (including those from the sun). Using the built-in comparator on its outputs gives either digital (HIGH / LOW) or analog (0V-5V) signals, depending on the intensity of the IR radiation.
Simple light sensor board
Light is one of the most important things in the life of most living beings. Because of this, it is common to work with light sensors when learning about electronics. The simple light sensor features a light-dependent resistor (LDR) and a sensor on a small breakout board for easier connection. As the name suggests, the LDR will change its resistance depending on the amount of light it’s exposed to. The amount of light and resistance are inversely proportional. The more light it’s exposed to, the less resistance it will have. Thus, if there’s more light, the board will have a resistance of a few hundred Ohms. If the resistor is in the dark, it will have a resistance of several thousand Ohms.
The main benefit of this board is ability to give analog and digital output. By setting the potenciometer on the board, you are able to get digital signal at the DO pin when signal crosses certain value, while analog values will be present on the AO pin at all times.

Simple light sensor board with easyC
Light is one of the most important things in the life of most living beings. This is why it is common to work with light sensors when learning about electronics. A simple light sensor has a light dependent resistor (LDR) and sensor on a breakout board for easy wiring. The simple sensor comes with easyC connectors onboard, which enables quick and easy connection with Dasduino microcontroller boards.
As the name suggests, an LDR will change its resistance depending on the amount of light it is exposed to. The amount of light and resistance are inversely proportional. The more light it is exposed to, the less resistance it will have. So if there is more light, the board will have a resistance of several hundred Ohms. If the resistor is in the dark, it will have a resistance of several thousand Ohms.

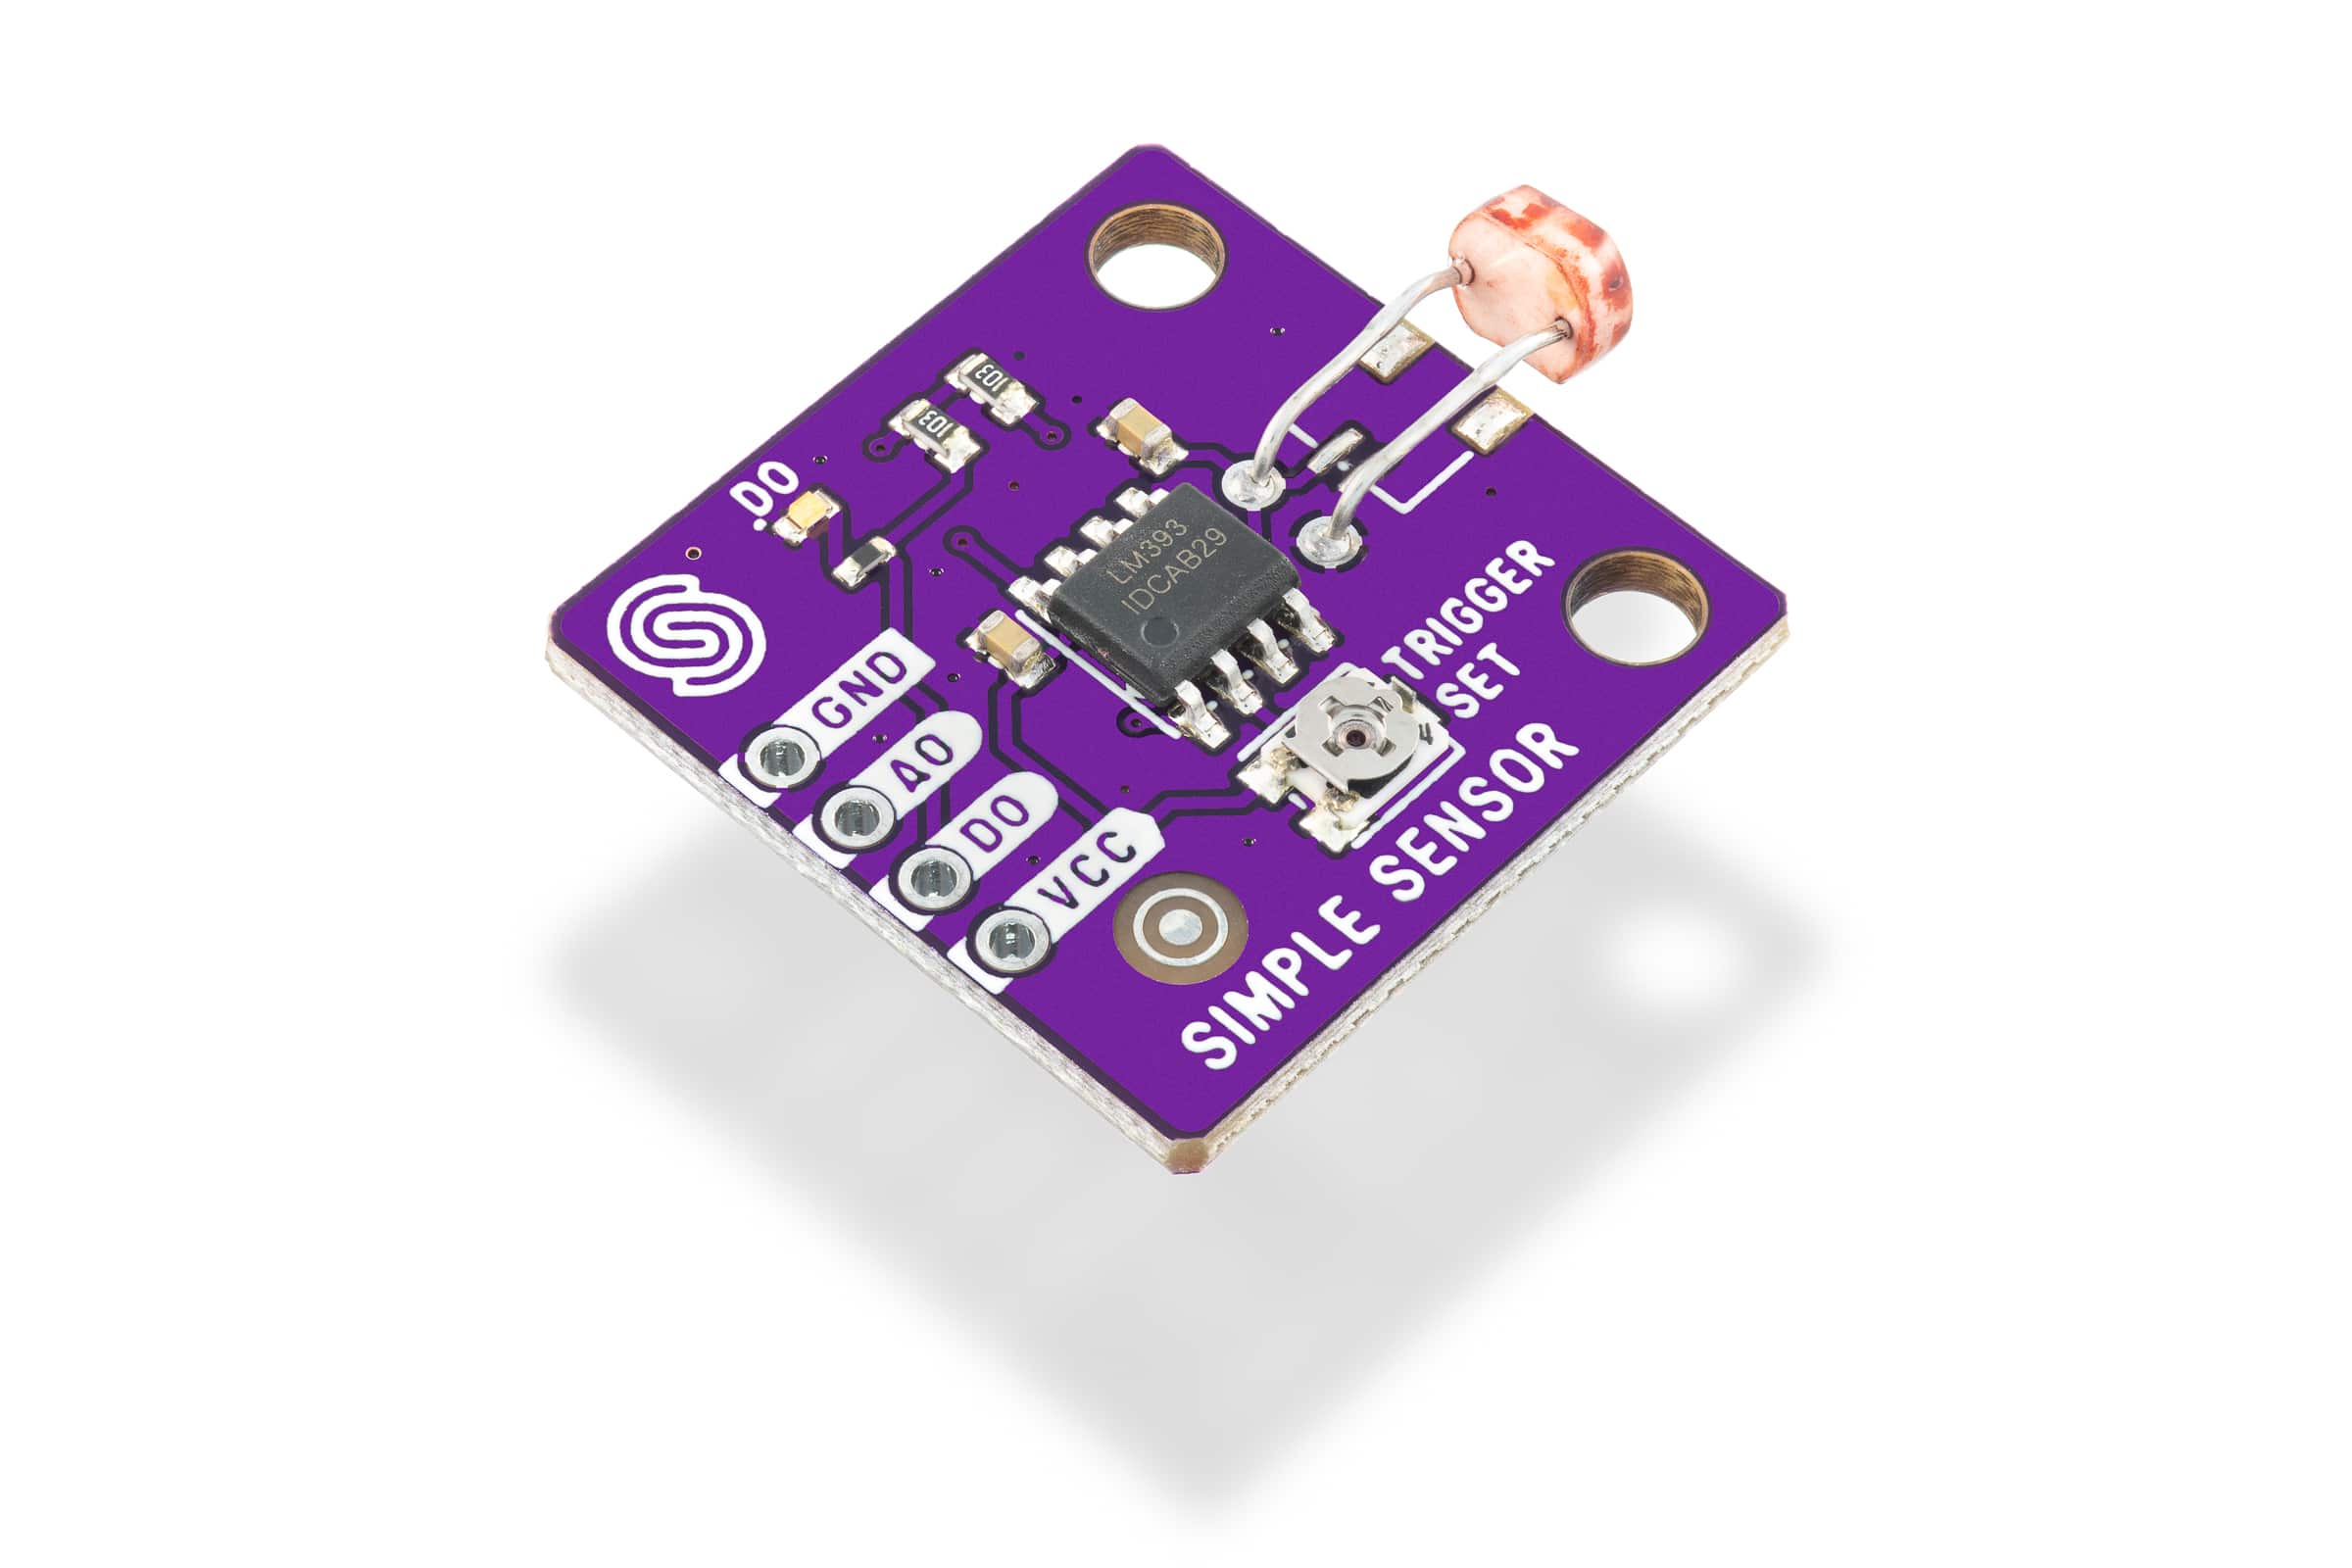
Simple rain sensor
Water is essential for life on Earth. Using water efficiently is very important. With the easy-to-use simple rain sensor, farmers can save water while irrigating their crops. The sensor will alert them to shut down the water supply when it senses rain. It can even act as an automatic on and off switch, like turning on wipers on a car when it senses rain.
This sensor has two pieces – the rain sensor and the simple sensor. The rain sensor has nickel-coated lines on both sides. It measures moisture and outputs the data to the simple sensor that reads it. The simple sensor uses the LM393 differential comparator. The main benefit of this board is ability to give analog and digital output. By setting the potentiometer on the board, you are able to get digital signal at the DO pin when signal crosses certain value, while analog values will be present on the AO pin at all times.

Smart LED WS2812B Ring12
WS2812B is an extremely interesting LED that can emit light in red, green or blue – or any combination of these three colors, able to show a total of approximately 16 million different colors. On this board diodes are arranged in a circle. They are controlled by a single pin with only few lines of code from Arduino IDE. That’s possible thanks to the integrated controller inside the LED itself!
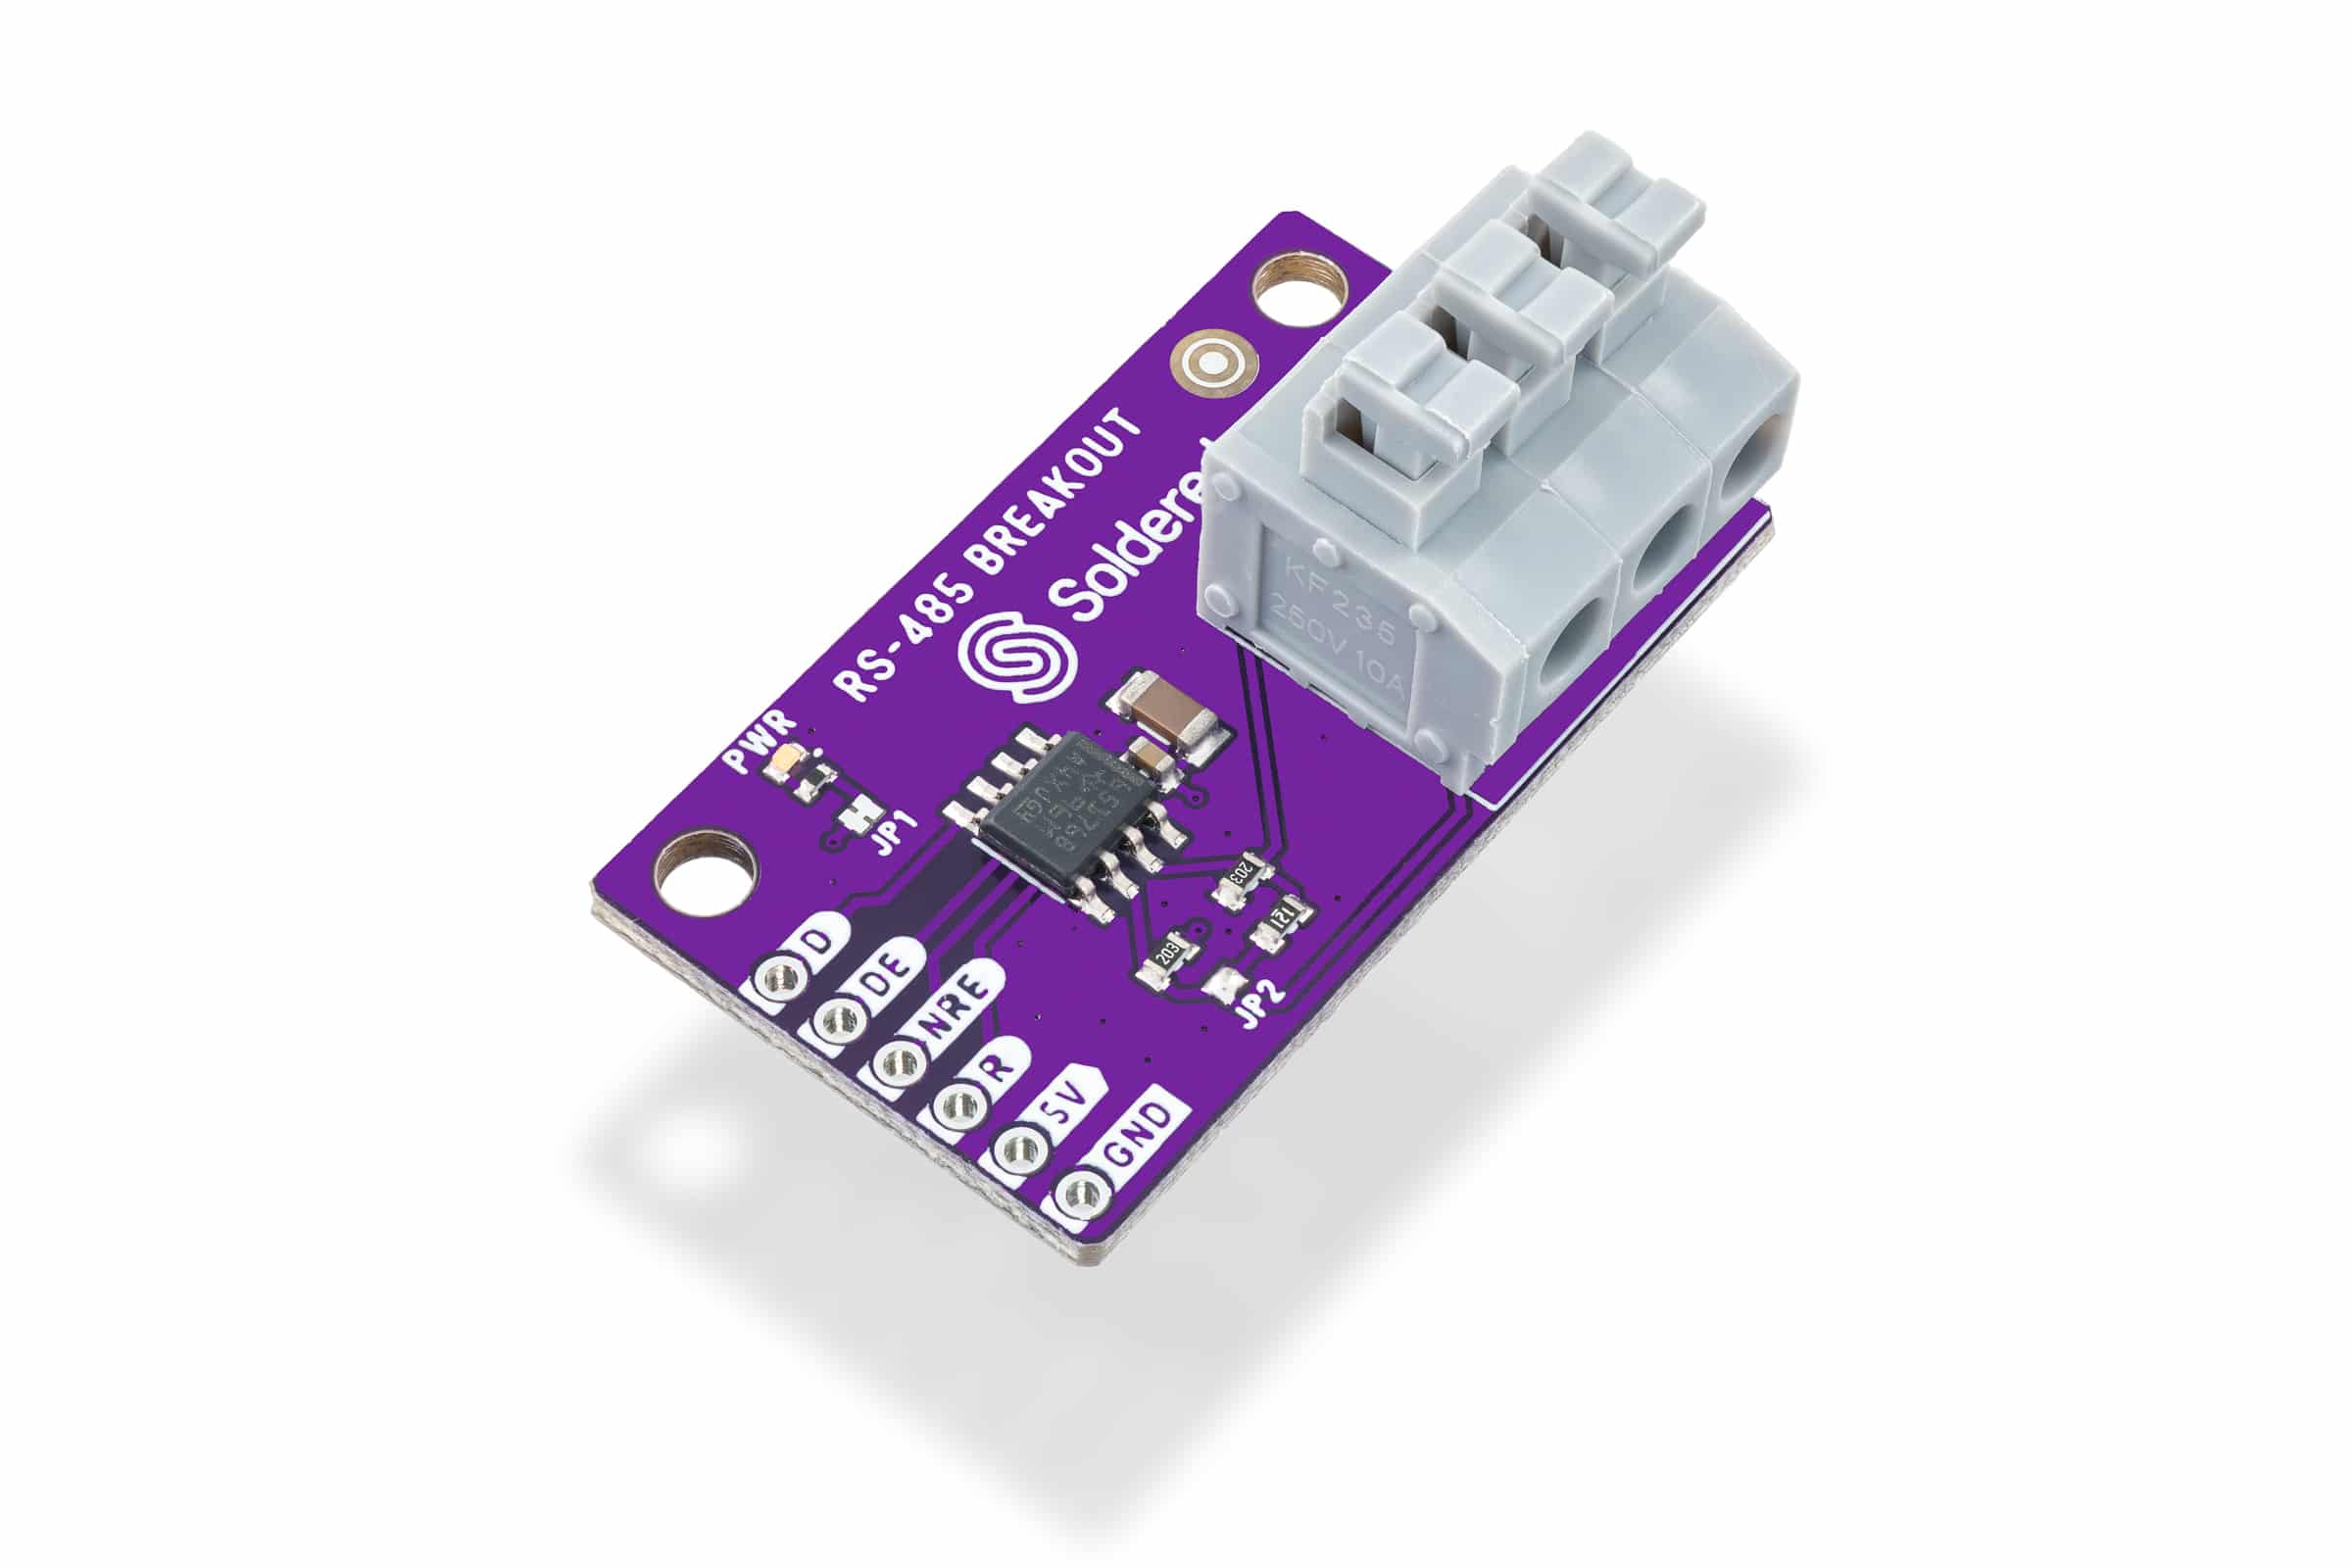
RS-485 transciever breakout
This module allows you to connect a Dasduino, or similar microcontroller, to a RS-485 communication protocol. The RS-485 is used to send data over long distances (up to 1200m) at 20Mbps and in high-noise environments, such as industrial. The module works on 5V and requires between 120μA and 500μA of current.
• Voltage: 5V
• Based on: SN65176BDR
• Dimensions: 38 x 2mm

RS-232 transciever breakout
The RS-232 is a standard and very popular protocol for communication between two devices. It is a full-duplex protocol which means it can receive and send data at the same time, and data is sent at voltages from + 3V to + 15V for a digital “one” and from -3V to -15V for digital “zero”. This provides a more secure environment for data transmission which is resistant to noise or interference, which is why the RS-232 is often used in industry. This module converts serial communication to RS232.
• Communication lines: TX, RX
• IC:232 MAX
• Voltage: 3.3V – 5.5V
• Dimensions: 22 x 22 mm

Fuel gauge BQ27441 breakout
Fuel gauge is a special type of accessory for lithium batteries that very precisely measures the state of the battery. This includes current voltage [mV], state of charge [%] and probably most interestingly: remaining capacity in the battery [mAh]. It is used with 1S batteries, and provides all this information via the I2C interface.
On our board you can find easyC connectors which allow I2C communication with microcontroller. Also, there is a JST input for any pouch battery you can find in our offer, as well as quick connect terminal connector for input if your source doesn’t have JST connector.

Digital light & proximity sensor LTR-507 breakout
For very precise measurements of the amount of light, take this digital light sensor into account (ALS – Ambient Light Sensor). In addition, the LTR-507ALS also measures the proximity (PS – Proximity Sensor) of the object to the sensor. It sends all this data via I2C communication, which is easy to read via our Arduino library.
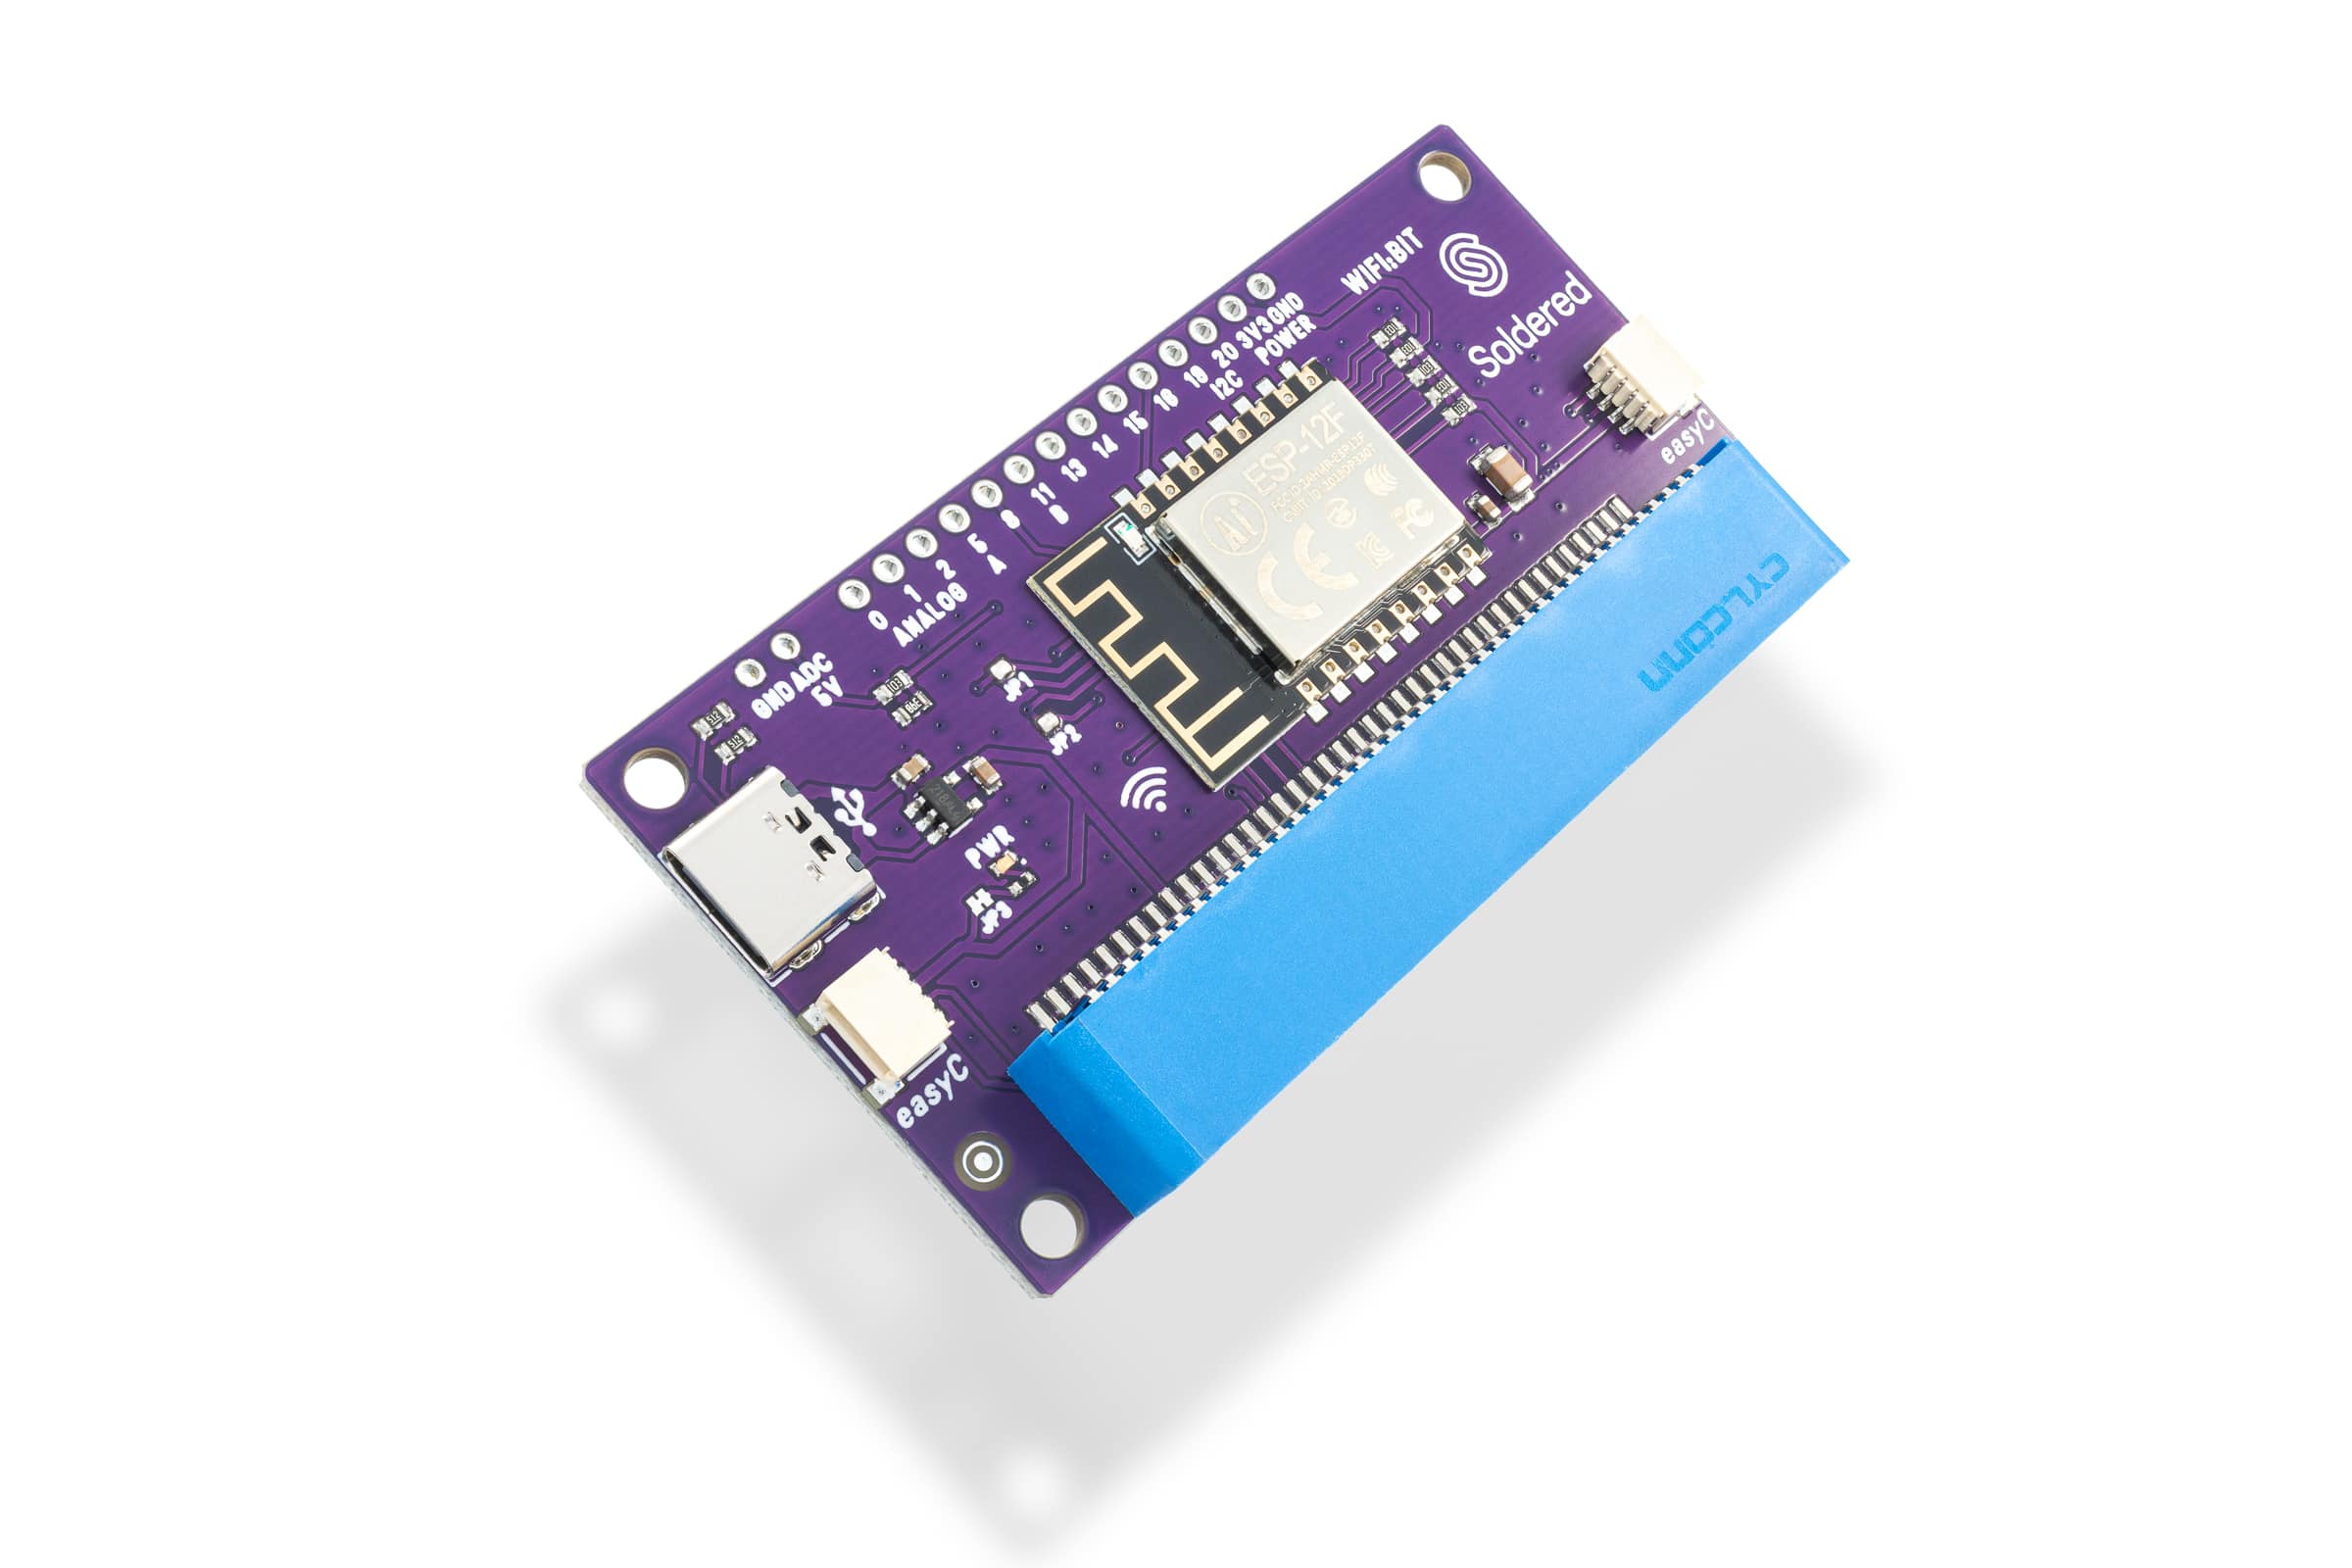
WiFi:bit
Micro:bit is a very interesting board with lots of options that are used by many children in school or hobbyists, but who can say no to new features! So we decided to make a micro:bit add-on that will enable internet connection via WiFi! Finally, you’ll be able to connect your micro:bit projects to the Internet and to connect to the well known Internet of Things. WiFi:bit add-on is easy to use through a MakeBlock add-on or using completed Python examples.
Just insert micro:bit to the add-on, plug in the power cable (required) and you are ready! Open the examples and start sending and receiving data from the internet. There are even two easyC connectors on the WiFi add-on, which allow the simplest connection of I2C sensors and actuators with micro:bit. There are also available pins on the board which are isolated on standard spacing used for breadboard connections or connections with cables to additional components!

Pressure & temperature sensor BMP180 breakout
Ever wanted to build your own weather station using Arduino? Then the BMP180 breakout board with precision sensor from Bosch might interest you. The digital sensor on the board precisely measures the changes in barometric pressure and temperature. It uses the piezoresistive effect to gather the information. Since the pressure varies depending on height, the sensor can measure altitude too. Very low current consumption and voltage allow this type of sensor to be used in many modern devices.
The design is 5V ready with an onboard regulator for 3.3V. The breakout board’s standard current consumption is very low, only 5 µA. It uses an I2C interface, and the I2C address is 0x77. No soldering, nor need for distinguishing between SDA and SCL is required due to easyC. The sensor has integrated EEPROM memory with data for calibration. The pressure is measured in steps of 1hPa (=0.01hPa =0,01mbar), and 0.1°C for temperature.
Product usage tips:
If there is an error while using the breakout board, see if it’s connected properly. Take a look at the pinout. If everything is properly connected, check if the I2C address of the breakout board is correct prior to programming it. The I2C 7-bit address should be 0x77. If everything is correctly connected and the I2C address is right, look through your code once again. There might be some bugs in the code that are stopping the sensor from working as it should.
BMP180 breakout board works very well in combination with any Dasduino board and OLED I2C 0.96” display breakout board. All of them use easyC so they can be connected in a matter of seconds. The BMP180 sensor can measure the barometric pressure and temperature, while the OLED display can show them. The breakout board also comes with two mounting holes so you can attach it onto something and it won’t budge.
To keep the sensor working for a long while, we would advise you not to use it in extreme conditions. Going over or below the temperature range will surely damage the sensor. Same with the pressure. Keep track of the current going through it. Allowing too high of a current through the breakout board will burn the sensor and render it completely useless.
Coming soon

NRF24L01 adapter for Dasduino boards
Connecting the NRF24L01 can be tricky – you have to pay attention to the layout of the pins, adjust them to match those from the library and add a capacitor. This board solves all that, and it already comes with soldered headers, so just plug this board into your Dasduino and that’s it!
• Comes with NRF24L01+ module
• Dimensions: 38 x 22 mm

PMS7003 sensor adapter
To connect to our PMS7003 air quality sensor easily, we designed this adapter. It allows you to connect the PMS7003 sensor to breadboard or to connect with cables.

Smart LED WS2812B Stick10
WS2812B is an extremely interesting LED that can emit light in red, green or blue – or any combination of these three colors, able to show a total of approximately 16 million different colors. On this board, diodes are arranged in a line of 10. You can even connect these sticks in a line. They are controlled by a single pin with only a few lines of code from Arduino IDE. That’s possible thanks to the integrated controller inside the LED itself!
• Number of LEDs: 10
• Voltage: 5V
• LED type: WS2812B
• Current: max 60mA per LED
• Dimensions: 80 x 10 mm

Smart LED WS2812B Ring7
WS2812B is an extremely interesting LED that can emit light in red, green or blue – or any combination of these three colors, able to show a total of approximately 16 million different colors. On this board, diodes are arranged in a circle. They are controlled by a single pin with only a few lines of code from Arduino IDE. That’s possible thanks to the integrated controller inside the LED itself!

Smart LED WS2812B Pixel
These small LEDs are not just ordinary lights – each is unique because it has a built-in small integrated circuit (IC) that is able to turn on the LED light in 16 million different colors. IC is WS2812 and it uses a single wire that can control thousands of these LEDs. With a little imagination by putting these pixels, you get superior effects with a minimum effort. These lamps are easy to control with Dasduino.

Display OLED I2C 0.96" SSD1306
Looking to add visuals to your Arduino projects? The I2C OLED breakout board is perfect for that. Because of its high contrast, you will be in awe of its crispness! The display is made from hundreds of LEDs, each representing one pixel in a 128×64 grid. Thus, it doesn’t need any backlight, and it needs less power than the classic LCD screens. That’s 8192 pixels all individually lit at your fingertips!
The design is 5V ready with an onboard regulator, so is compatible with any 3.3V board. The breakout board uses only about 20 mA, depending on active pixels. It is easy to control over the I2C interface. It is even easier to connect with the easyC system – no soldering required!
Display OLED I2C 0.96″ SSD1306 options:
The color of the OLED screen on the product can be:
– White
– Blue

DAC 6-bit 1-channel MCP47A1 breakout
This device uses MCP47A1 which is a single channel, 6-bit digital to analog converter with I2C compatible serial interface. There’s no integrated EEPROM memory which would allow DAC register and configuration bit values to be saved at powered off.

Real time clock RTC PCF85063A breakout
RTC (Real Time Clock) is a device that carefully and precisely tracks time and dates. It is extremely precise, so it is more suitable for long-term time tracking than clocks on microcontrollers. This breakout can work with an extremely low current and thanks to the alarm feature and interrupt pin, it will allow a microcontroller to enter sleep mode until its awaken by this RTC.
It has a built-in battery holder (battery not included) and even if power is lost, real-time tracking won’t be affected.